Blog

RSS

How I make infinite procedural swords

January 26th, 2020 (edited November 3rd, 2022)

If you haven't seen my procedural sword generator, you can check it out at that link.

Four randomly-generated sword sprites.

This is a custom algorithm written specifically to produce swords - not using any kind of generic machine-learning. I'm pretty happy with the amount of variety it can produce - each piece (the blade shape, the crossguard, the hilt, and the pommel) is generated from scratch from a variety of randomized parameters. So how does it work?

Process Note

I usually start a procgen project by trying to draw the thing I'm making by hand. This helps me analyze how it's made - in particular, how colors combine and where shadows and highlights go. After a quick web search for "pixel art sword" and some experimentation and iteration, I came up with this:

Simple, hand-drawn pixel art sword sprite.

Pretty basic, but it helped me figure out how to color the blade (a key part of the art I was unsure about) with a light half and a dark half, a gradient that starts dark at the hilt and runs up the blade, and a rim of very light pixels to hint at "sharpness".

The Algorithm

You can follow along in the Javascript source code (drawRandomBlade function) if you'd like to see more implementation details.

Off the top, I randomize and calculate a bunch of values within ranges I set (and tweaked over time), such as:

  • The pommel, hilt, crossguard, and blade lengths
  • The blade's start width and taper
  • The blade's chance to acquire a "jog" or a "curve", and the max magnitude of those
  • Parameters for a cosine wave that can vary the blade's width

Next, I generate the shape of the blade. I start where the top of the crossguard is going to be with a forward angle of 45 degrees, then step forward one pixel at a time. Each time, I push the point into an array, along with some metadata like the current direction, how far along the blade it is, and the width at that point (which can vary based on the cosine wave I mentioned before). After recording the point, I randomly check to see if the blade should "jog", making a sharp angle, or acquire a curve. Then, move on to the next point.

A curved line showing the generated sword shape.

Now I actually render the blade. Walking along the control points drawing segments is intuitive, but it seemed tricky to make sure the space between each segment gets filled in properly. So instead, I actually iterate over every pixel in the image. I determine which control point is closest to that pixel, then check the distance to it. If it's within the blade's radius, we'll draw it.

Color: here's how I decide what color a blade pixel will be:

  1. In the point metadata, I previously saved a normal vector that points to the "left" of the control point. I can do a dot product between that and the vector between the pixel and the control point to figure out if it's on the left or right side of the blade. I pick the light color or the dark color based on that.
  2. Darken the color based on how far along the blade the control point is (another value I stored in the metadata).
  3. If the pixel is very close to the edge of the blade (i.e. the distance between it and the control point is close to the blade width), I blend in the very light "edge" color.

For most of these operations, I'm using linear interpolation to blend two different colors together.

Only the blade of a random sword.
It's not the same sword, sorry, I don't have seeding yet.

Next, it's on to the hilt. This is much simpler: I generate another cosine wave to control the lines of the grip, a width, and a color. When randomizing colors, I usually work in HSV and convert to RGB before drawing because I'm not so interested in controlling how red or green or blue the color is, but I'm much more interesting in controlling how bright (V) and how colorful (S) it is. In this case I make sure the color has a high V so it has room to get darker to make shadows.

Then I just walk along the hilt drawing slices. There is some rounding trickery to make sure I get all the pixels filled in nicely. The color of each pixel is based on the value of a cosine wave, and darkened somewhat toward the right side.

Now the crossguard. The process for this is nearly the same as that for the blade - just in a different direction. I generate two different curves for the left and right parts, but with a high probability I just discard one of them and use the other, mirrored.

Finally, the pommel. I was getting itchy to share my work at this point, so I didn't do too much here. Just generate a random radius, and draw a circle in the same color as the crossguard that's shaded darker to the bottom-right and lighter to the top-left.

Oh, and the black border is added here at the very end. Any pixel that's empty or at the edge of the canvas, and orthogonally adjacent to a filled pixel, gets filled in black.

I hope that gives you some interesting ideas! Since you made it through all that, here's a gif of the process:

An animation of a sword being drawn pixel-by-pixel.


Permalink


No BeginPlay calls in Unreal 4? Here's why.

December 22nd, 2019

Here's a strange and difficult-to-track-down bug that happened to me, so I wanted to share the solution in case someone else who needs it might find it. You're working in Unreal and suddenly none of your actors are receiving BeginPlay. This breaks your game.

If you search for this, you'll find a lot of people who overrode BeginPlay and forgot to include a call to Super (C++) or Parent (Blueprints). That will cause the BeginPlays of that object's parents to not be called, and is definitely a common and subtle bug. But what if it's happening to all your actors, even ones that have no inheriting children?

I only found this in a single YouTube video, which fortunately had the answer - when creating custom Game States or Game Modes, you must consistently inherit from AGameStateBase and AGameModeBase or AGameState and AGameMode. You can't mix and match them, or you will break the code that calls BeginPlay, which lives in the game mode.

Which should you use? According to the header, AGameState and AGameMode are intended for use with match-based multiplayer games. So if you're making one of those, use them, otherwise, use the Base ones.


Permalink

Periodic Deliveries Postmortem - Time-Saving Tricks

December 9th, 2019 (edited November 3rd, 2022)

I'm releasing a Unity 2018 game called Periodic Deliveries! Development of any game is fraught with little speedbump tasks that slowly soak up dev time and make it a little less fun, too. Here are a few tricks I did to knock out some of those bumps in my process that you can easily implement in your Unity projects, too.

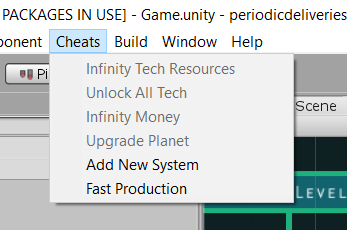
Use the MenuItem attribute to create developer cheats

In a larger game with a larger team, you might implement a developer console you can activate with a key press and type commands into. That will scale well if you have a lot of commands, and it will work in standalone builds. But if your game is small, this is a quick and effective approach. Quick implementation is important because it will encourage you to add cheats more often, and those will save you time as development goes on.

Screenshot of a dropdown menu containing cheat commands

I put them all in a static class called CheatCommands. Don't forget to add a validation function, which will disable the option when it doesn't make sense and improve your own experience.

public static class CheatCommands
{
	[MenuItem("Cheats/Infinity Money", true)]
	public static bool ValidateInfinityMoney()
	{
		// Disables the item in Edit Mode and in the Main Menu
		return InGameManager.Instance.PlayerCompany != null;
	}

	[MenuItem("Cheats/Infinity Money")]
	public static void InfinityMoney()
	{
		InGameManager.Instance.PlayerCompany.AddMoney(PeriodicInt.PositiveInfinity);
	}
	
	...
}

Make custom property drawers for structs that show up in the Inspector

Using Serializable structs for common data patterns can help you avoid writing similar code multiple times. But you'll have to expand a foldout every time you want to edit this data in the Inspector. If you can write a custom property drawer quickly, you can save yourself a lot of clicks over the entire development of your project.

Here is a base class for a common property drawer I used several times. You can inherit from it to create a custom property drawer for any struct that represents a "quantity" of a "thing" (like a stack of items in a loot container, or an ingredient requirement in a recipe).

using UnityEditor;
using UnityEngine;

// Author: Brian MacIntosh (The Periodic Group)
// MIT License

/// <summary>
/// Base class that can be extended to quickly create a property drawer for a structure containing
/// data like "quantity" of "thing".
/// </summary>
public abstract class ItemQuantityPropertyDrawer : PropertyDrawer
{
	/// <summary>
	/// Name of the quantity/stack size property.
	/// </summary>
	public abstract string QuantityPropName { get; }

	/// <summary>
	/// Name of the item/object property.
	/// </summary>
	public abstract string ItemPropName { get; }

	public override void OnGUI(Rect position, SerializedProperty property, GUIContent label)
	{
		EditorGUI.BeginProperty(position, label, property);

		position = EditorGUI.PrefixLabel(position, GUIUtility.GetControlID(FocusType.Passive), label);

		int indent = EditorGUI.indentLevel;
		EditorGUI.indentLevel = 0;

		Rect quantityPosition = position;
		quantityPosition.width = 40f;
		Rect resourcePosition = position;
		resourcePosition.xMin += quantityPosition.width + 4f;
		EditorGUI.PropertyField(quantityPosition, property.FindPropertyRelative(QuantityPropName), GUIContent.none);
		EditorGUI.PropertyField(resourcePosition, property.FindPropertyRelative(ItemPropName), GUIContent.none);

		EditorGUI.indentLevel = indent;

		EditorGUI.EndProperty();
	}
}

Alternatively, get it from Github.

Here's an example use:

//RecipeComponent.cs

[Serializable]
public class RecipeComponent
{
	[Tooltip("The resource.")]
	public ResourceData Resource;

	[Tooltip("The quantity of the resource.")]
	public int Quantity = 1;

	public RecipeComponent(ResourceData resource, int quantity)
	{
		Resource = resource;
		Quantity = quantity;
	}

	public override string ToString()
	{
		return Quantity.ToString() + " " + Resource.name;
	}
}
//RecipeComponentPropertyDrawer.cs

using UnityEditor;

[CustomPropertyDrawer(typeof(RecipeComponent))]
public class RecipeComponentPropertyDrawer : ItemQuantityPropertyDrawer
{
	public override string ItemPropName
	{
		get { return "Resource"; }
	}

	public override string QuantityPropName
	{
		get { return "Quantity"; }
	}
}

Separate your code files into 'Game' and 'SDK' folders

Put any code files that are specific to this game in the 'Game' folder. Put any code files that might be useful on your future games in the 'SDK' folder. The idea here is to create a folder that you can literally copy and paste into your next project (or you can use a git submodule if you jump back and forth between a lot of projects).

You need to follow one rule to make this work: code in the 'SDK' folder can never reference code in the 'Game' folder. If this happens, either (1) rework your SDK code so the Game code can insert its own behavior - for example, provide an event it can subscribe to, or virtual methods it can override - or (2) put that code in the Game folder.

My SDK folder contains things like:

  • Static classes full of utility functions (MathUtility, ListUtility, etc).
  • The abstract property drawer above (in an Editor subfolder).
  • My generic input context system.
  • Generic helper components, like PositionAtMouse, MirrorColor, GameObjectPool...
  • etc.

If do this, you will write better, reusable code and save yourself time debugging this project and implementing these functions on the next.

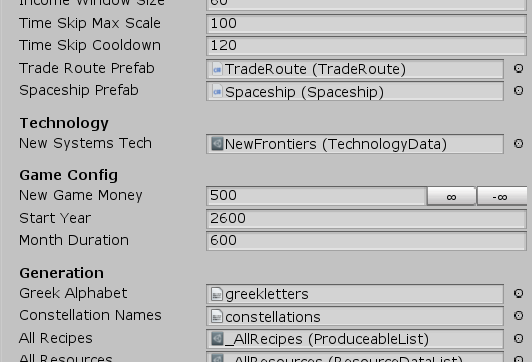
Use a GlobalData ScriptableObject

ScriptableObjects are a great tool for organizing data. I like creating a scriptable object for each item, ability, and other such thing in my game to hold all the data associated with it. On Periodic Deliveries, I also created a monolithic 'GlobalData' object. This object holds all those global configuration options that usually end up throughout the project on various manager components and code constants. Putting them in one place meant I never had to spend time tracking down where so particular value was. The scriptable object also diffs much better in source control than a component in a scene, in case you need to look back through the history.

The GlobalData object can be held on a global singleton component somewhere, or maybe loaded with the new Addressable Asset system (I haven't played with it yet).

Screenshot of the Global Data object inspector

I hope some of these tips can make your development a little faster and more fun. If you're into space, simulation, or management games, don't forget to check out Periodic Deliveries on Steam!


Permalink

Periodic Deliveries - Steam Release!

December 7th, 2019 (edited March 4th, 2023)

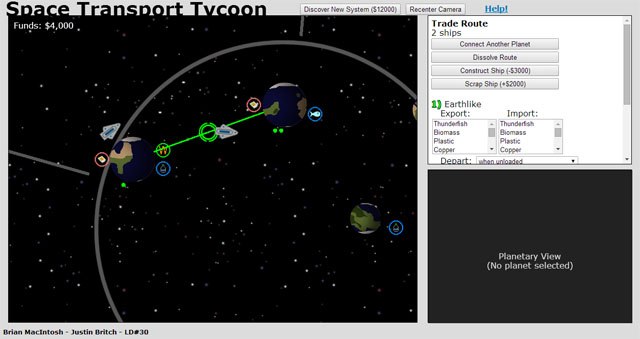
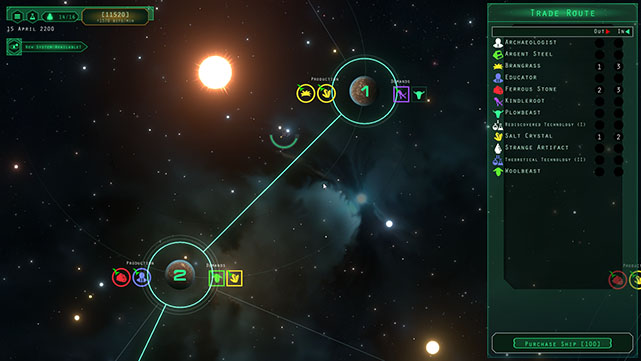
Way back in Ludum Dare 30 Justin Britch and I made a game called Space Transport Tycoon (which you can still play in your browser for free. Four years later, we still remember it fondly as the the game we spent the most time actually playing after making it. This year, we finally resurrected it as Periodic Deliveries and we're publishing it on December 17th on Steam!

Check out this before-and-after:

Space Transport Tycoon screenshot

We've obviously upgraded the visual quality, thanks to our real artist, John Lewis. The game still features the same core mechanic - configuring trade routes between planets to move certain goods from where they're produced to where they're needed - but we changed several peripheral mechanics. In the game jam, I wanted to create a game with multiple views shown simultaneously. That's how we got the planetary view at the bottom-right, where you could relocate factories to tiles that had more optimal conditions, based on the type of factory. This ended up being one of those features that had a lot of cool stuff in the implementation but didn't work in practice - it was just a quick chore to do once on each new planet. We removed it to focus on the main view.

One small change had a big impact: we prohibited trade routes from crossing each other. In Space Transport Tycoon, you'd often build a crisscrossing web of routes that wasn't terribly satisfying. The new restriction requires the player to use certain planets as hubs and create arterial intermediate routes, which we think is an important and cool part of the shipping fantasy.

Periodic Deliveries screenshot

The UI also got a big rework. The old UI was "planet-centric" - that is, you selected a trade route and were presented with a list of every planet on that route, with controls to configure the behavior at each planet. This allows the player to picture everything that happens at a particular planet little more easily, but it requires extra mental steps to think about what happens to a particular good across the entire route - the later being much more useful to the player than the former. The list can also get arbitrarily long, which is kind of a UI nightmare. Periodic Deliveries now uses a goods-centric UI, where the player sees a list of goods that are involved with the route, and configures which planets import or export that good.

That's just a few of the larger changes we made for Periodic Deliveries. If it sounds like something you'd like, try out Space Transport Tycoon right now and wishlist Periodic Deliveries below!

This post has been updated: the explanation of planet-centric vs. goods-centric UI was backwards.


Permalink


Previous Page
88 posts — page 2 of 18
Next Page