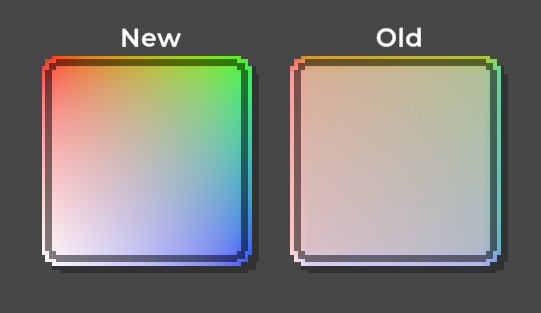
Some time ago, I shared a Unity shader for coloring a Unity UI element with a 2D gradient. That post seems to get a lot of traffic, so I thought I should share my improved version as well.
The original shader uses the first UV channel to distribute the gradient color, which means it only works well with the Simple image type. The other Image types do funny things with that UV channel. To solve this, I created a special version of the Image component that also produces a second UV channel. The second channel is always evenly distributed over the entire image, regardless of the Image Type.
It's been a few Ludum Dares since I participated, but last weekend I jumped in for the Ludum Dare 46 with audio designer Christian Camargo. This Dare saw a big spike in participation this time around, probably due to the stay-at-home orders in many places. The theme was "Keep it Alive". We worked in Unity with Wwise.
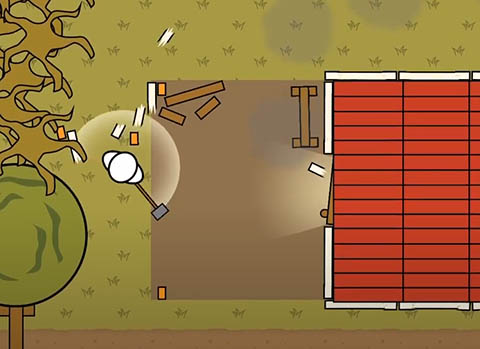
After starting, as always, by spamming a heap of ideas out on (virtual) paper, I started trying to mash two or more of the ideas together into a hybrid idea. "The Wrecker" was born from the union of a game about a factory poisoning a town, and my recent playthrough of Red Faction: Guerrilla and love for its granular destruction systems. We also grabbed two other elements from the doc we wanted to include: a time limit to push the player forward, and the idea that the player is also dying and needs to prioritize their own health against that of the town. That more than was enough to get started!
What We Learned
Wwise
The decision to use Wwise for our audio had some pros and cons. Despite being relatively unfamiliar with it as the programmer of the team, I was able to hook in pretty easily by making a single call to posting a string-named event when audio cues should be played or stopped. Christian was able to do a lot of customization in Wwise, such as randomizing the sounds played and their parameters, that I didn't need to implement.
On the down side, however, Wwise did not play nicely with Unity's Collab source control, which only synchronizes the Unity project data and did not understand that there was also a Wwise project to synchronize. This effectively siloed off the audio work until we manually transfered the project, and I didn't hear most of the audio until a few hours before the deadline. Theoretically, Wwise is capable of building audio banks into the project that could be synced, but in the jam crunch we never got that working.
I also discovered late on Saturday (making an early test build to catch any build problems - I definitely recommend it) that WWise is not compatible with Unity WebGL builds, which are the optimal way to get Ludum Dare raters into the game quickly. Fortunately this does not appear to be affecting our ability to get ratings.
Physics Gameplay
I chose to implement the game's progression through three different weapons, each capable of breaking more objects than the last, and only the final weapon was able to break through the doors into the factory. It's a pretty time-honored design. However, I opted to implement the destruction with Unity's breakable physics joint system, in which each joint has a specified Break Force.
This was a quick way to get everything up and running, but the result was a huge number of breakable joints scattered throughout the game's prefabs, many of which needed to be carefully balanced so they were only breakable by the appropriate weapon. Any change to physics parameters, such as the player's movement speed or weapon swing speed, could throw off everything. If I did this over, I would probably try to implement explicit, hard limitations on which objects can be broken by which weapons rather than relying on the implicit interactions of the physics engine to gate crit-path gameplay.
Vector Graphics
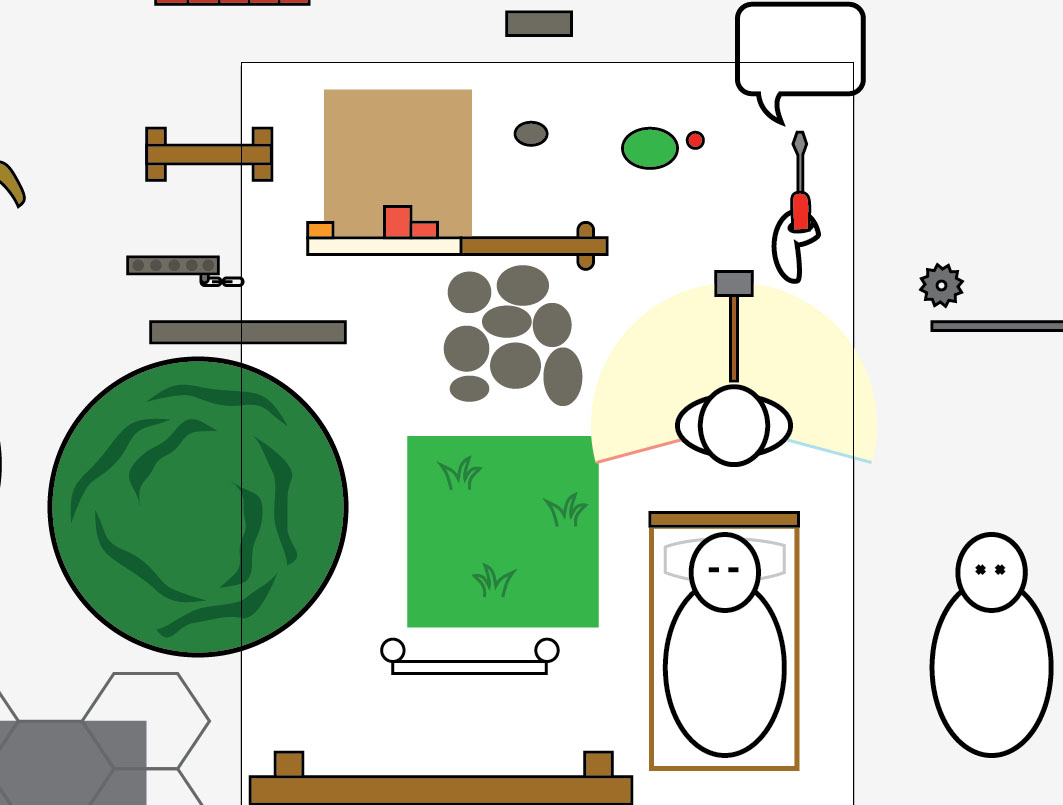
I used Adobe Illustrator to produce all the art for the game. This was very efficient, and I was able to turn out assets incredibly quickly and get back to coding. I made all the assets on two artboards (Game and UI), which made it quick and easy to ensure everything was at a consistent scale and stroke width. I used a simple visual language that I think contributes significantly to the game's clean look - collidable objects have a black stroke and background objects have none. Additionally, control prompts are always a key in a rounded white rectangle.
If you haven't check out the game yet, you can download it for free from this link, or watch a video right over here! If you are a Ludum Dare participant, you can rate the game at its Ludum Dare page.
I'm releasing a Unity 2018 game called Periodic Deliveries! Development of any game is fraught with little speedbump tasks that slowly soak up dev time and make it a little less fun, too. Here are a few tricks I did to knock out some of those bumps in my process that you can easily implement in your Unity projects, too.
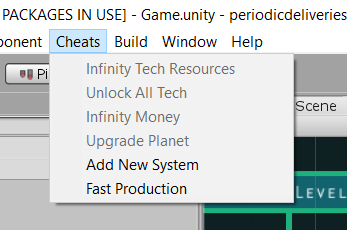
Use the MenuItem attribute to create developer cheats
In a larger game with a larger team, you might implement a developer console you can activate with a key press and type commands into. That will scale well if you have a lot of commands, and it will work in standalone builds. But if your game is small, this is a quick and effective approach. Quick implementation is important because it will encourage you to add cheats more often, and those will save you time as development goes on.
I put them all in a static class called CheatCommands. Don't forget to add a validation function, which will disable the option when it doesn't make sense and improve your own experience.
publicstaticclass CheatCommands
{[MenuItem("Cheats/Infinity Money",true)]publicstaticbool ValidateInfinityMoney(){// Disables the item in Edit Mode and in the Main Menureturn InGameManager.Instance.PlayerCompany !=null;}[MenuItem("Cheats/Infinity Money")]publicstaticvoid InfinityMoney(){
InGameManager.Instance.PlayerCompany.AddMoney(PeriodicInt.PositiveInfinity);}...}
Make custom property drawers for structs that show up in the Inspector
Using Serializable structs for common data patterns can help you avoid writing similar code multiple times. But you'll have to expand a foldout every time you want to edit this data in the Inspector. If you can write a custom property drawer quickly, you can save yourself a lot of clicks over the entire development of your project.
Here is a base class for a common property drawer I used several times. You can inherit from it to create a custom property drawer for any struct that represents a "quantity" of a "thing" (like a stack of items in a loot container, or an ingredient requirement in a recipe).
using UnityEditor;using UnityEngine;// Author: Brian MacIntosh (The Periodic Group)// MIT License/// <summary>/// Base class that can be extended to quickly create a property drawer for a structure containing/// data like "quantity" of "thing"./// </summary>publicabstractclass ItemQuantityPropertyDrawer : PropertyDrawer
{/// <summary>/// Name of the quantity/stack size property./// </summary>publicabstractstring QuantityPropName {get;}/// <summary>/// Name of the item/object property./// </summary>publicabstractstring ItemPropName {get;}publicoverridevoid OnGUI(Rect position, SerializedProperty property, GUIContent label){
EditorGUI.BeginProperty(position, label, property);
position = EditorGUI.PrefixLabel(position, GUIUtility.GetControlID(FocusType.Passive), label);int indent = EditorGUI.indentLevel;
EditorGUI.indentLevel =0;
Rect quantityPosition = position;
quantityPosition.width = 40f;
Rect resourcePosition = position;
resourcePosition.xMin += quantityPosition.width + 4f;
EditorGUI.PropertyField(quantityPosition, property.FindPropertyRelative(QuantityPropName), GUIContent.none);
EditorGUI.PropertyField(resourcePosition, property.FindPropertyRelative(ItemPropName), GUIContent.none);
EditorGUI.indentLevel = indent;
EditorGUI.EndProperty();}}
Separate your code files into 'Game' and 'SDK' folders
Put any code files that are specific to this game in the 'Game' folder. Put any code files that might be useful on your future games in the 'SDK' folder. The idea here is to create a folder that you can literally copy and paste into your next project (or you can use a git submodule if you jump back and forth between a lot of projects).
You need to follow one rule to make this work: code in the 'SDK' folder can never reference code in the 'Game' folder. If this happens, either (1) rework your SDK code so the Game code can insert its own behavior - for example, provide an event it can subscribe to, or virtual methods it can override - or (2) put that code in the Game folder.
My SDK folder contains things like:
Static classes full of utility functions (MathUtility, ListUtility, etc).
The abstract property drawer above (in an Editor subfolder).
My generic input context system.
Generic helper components, like PositionAtMouse, MirrorColor, GameObjectPool...
etc.
If do this, you will write better, reusable code and save yourself time debugging this project and implementing these functions on the next.
Use a GlobalData ScriptableObject
ScriptableObjects are a great tool for organizing data. I like creating a scriptable object for each item, ability, and other such thing in my game to hold all the data associated with it. On Periodic Deliveries, I also created a monolithic 'GlobalData' object. This object holds all those global configuration options that usually end up throughout the project on various manager components and code constants. Putting them in one place meant I never had to spend time tracking down where so particular value was. The scriptable object also diffs much better in source control than a component in a scene, in case you need to look back through the history.
The GlobalData object can be held on a global singleton component somewhere, or maybe loaded with the new Addressable Asset system (I haven't played with it yet).
I hope some of these tips can make your development a little faster and more fun. If you're into space, simulation, or management games, don't forget to check out Periodic Deliveries on Steam!
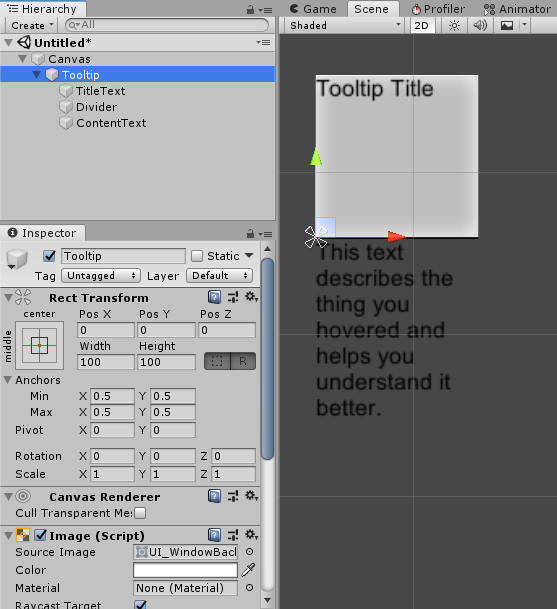
You have a UI widget that contains a number of different elements (text, images, etc). These are all children of a background element, which you want to automatically resize to encompass all of these children.
You read a bunch of forum threads and the documentation and it just won't work. Me too. I figured it out, though, so I'm documenting it here. This was written with reference to Unity 2018.3.3.
To demonstrate, I'll be creating a tooltip. I'm starting with a naive implementation - a few different widgets that are children of a VerticalLayoutGroup.
The first important concept to understand is the idea of "preferred" size. Preferred size is an internal value that some UI components have (specifically, ones that implement the ILayoutElement interface). It doesn't have anything to do with any of the values of the RectTransform on that element. Some examples of components that have a preferred size:
Image - The preferred size is the original size of the sprite being used.
Text - The preferred size is the size of the actual visible text.
Layout Groups - The preferred size is the size of the bounds encompassing all of the group's children.
Layout Element - Allows you manually set the preferred size for an object.
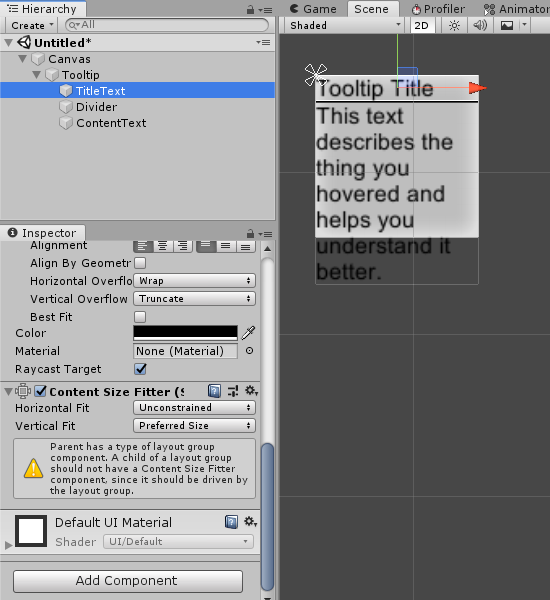
By default, Layout Groups look at the RectTransform size of their children when deciding how to position them, not the preferred size1. Remember that for Text components, the visual size of the rendered text is the preferred size, not the RectTransform size. So in order to include Text in a Layout Group and have it respond to the actual rendered text, we need to set the text's RectTransform size to match its preferred size.
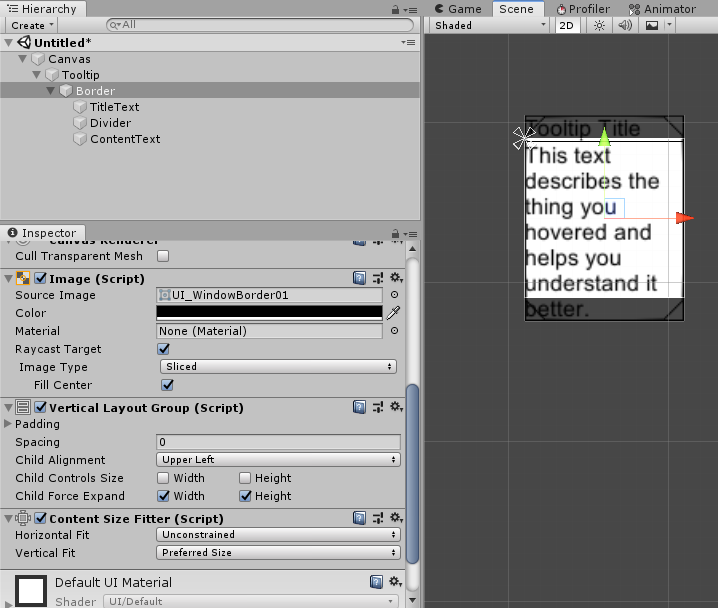
There is a built-in component for this called ContentSizeFitter. When attached to a GameObject with a UI component on it, it can set the RectTransform size of that object to match the preferred size.
I'll attached ContentSizeFitters to each of the Text objects and set the Vertical Fit to "Preferred Size". You may have to disable and re-enable the VerticalLayoutGroup to get it to refresh. You'll also see a warning message on the ContentSizeFitter component about the parent layout group, which you can ignore for now (but see footnote 1).
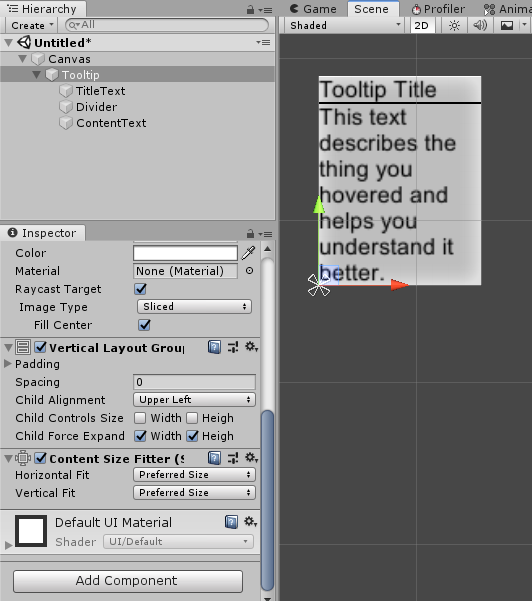
This is getting closer, but the background (an Image component on the Tooltip object) isn't resizing yet. Remember that the preferred size of the VerticalLayoutGroup is the size of the bounds encompassing all its children. So let's just add a ContentSizeFitter to the VerticalLayoutGroup object and set both fits to "Preferred Size".
And that's pretty much it. You can use the Padding and Spacing properties on the Layout Group to clean it up.
1 Layout Groups have two checkboxes for "Child Controls Size", one for the Width and one for the Height. Checking these boxes causes the Layout Group to automatically perform the function of the ContentSizeFitter - changing the RectTransforms of the children to match their preferred size. This allows you achieve the same result without ContentSizeFitters, and it is apparently how Unity now intends it to be done; however, it affects ALL the children of the layout group. That includes the divider in this case, which we didn't want to resize. We could have fixed this by adding a LayoutElement component to the divider and setting its preferred height to 1.
One more thing
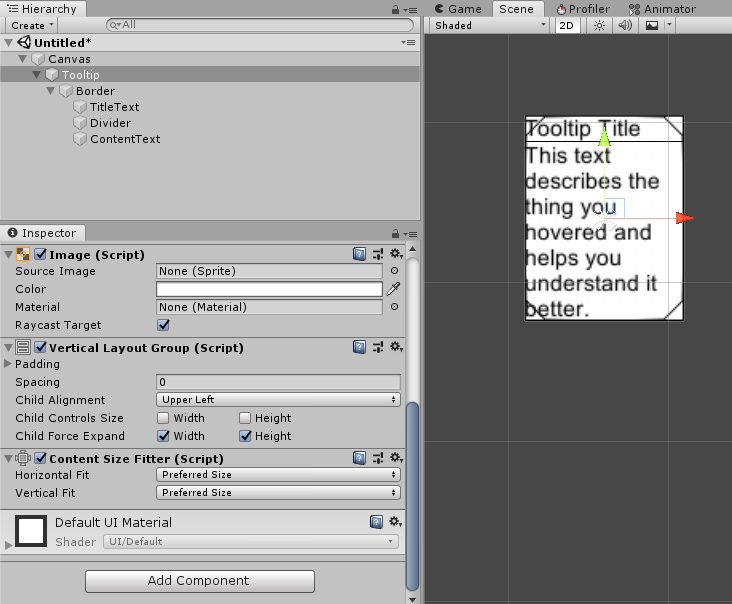
What if I wanted to introduce a second part of the background - a border? Ordinarily, I would make the border a child of the background and set the RectTransform Anchors to stretch both dimensions. But that won't work in this case because the background can no longer find the content items (Layout Groups only operate on their immediate children), so it won't grow to match them.
What we really want in this case is to pass the size up from a Layout Group on the border. I move the Layout Group and ContentSizeFitter from the background to the border. Now the border is sizing correctly, but I need to get the background to match it as well.
Remember that Layout Groups set their own preferred size to the size of the bounds encompassing all of the group's children. So we can achieve this by adding a Horizontal or Vertical Layout Group to the background (they will produce the same result with only one child), which sets the preferred size, and then adding a ContentSizeFitter to the background, resizing the RectTransform to match.
EDIT: An updated version of this shader that supports Sliced images is available here.
I created a variant of Unity's default UI shader; instead of using a solid tint color across the entire element, it uses a four-color gradient. The source is MIT-licensed and available on GitHub.