


How I make infinite procedural swords
January 26th, 2020 (edited November 3rd, 2022)If you haven't seen my procedural sword generator, you can check it out at that link.
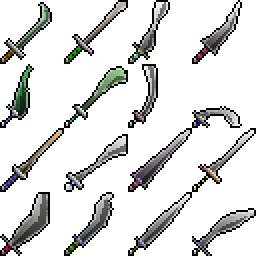
This is a custom algorithm written specifically to produce swords - not using any kind of generic machine-learning. I'm pretty happy with the amount of variety it can produce - each piece (the blade shape, the crossguard, the hilt, and the pommel) is generated from scratch from a variety of randomized parameters. So how does it work?
Process Note
I usually start a procgen project by trying to draw the thing I'm making by hand. This helps me analyze how it's made - in particular, how colors combine and where shadows and highlights go. After a quick web search for "pixel art sword" and some experimentation and iteration, I came up with this:
![]()
Pretty basic, but it helped me figure out how to color the blade (a key part of the art I was unsure about) with a light half and a dark half, a gradient that starts dark at the hilt and runs up the blade, and a rim of very light pixels to hint at "sharpness".
The Algorithm
You can follow along in the Javascript source code (drawRandomBlade function) if you'd like to see more implementation details.
Off the top, I randomize and calculate a bunch of values within ranges I set (and tweaked over time), such as:
- The pommel, hilt, crossguard, and blade lengths
- The blade's start width and taper
- The blade's chance to acquire a "jog" or a "curve", and the max magnitude of those
- Parameters for a cosine wave that can vary the blade's width
Next, I generate the shape of the blade. I start where the top of the crossguard is going to be with a forward angle of 45 degrees, then step forward one pixel at a time. Each time, I push the point into an array, along with some metadata like the current direction, how far along the blade it is, and the width at that point (which can vary based on the cosine wave I mentioned before). After recording the point, I randomly check to see if the blade should "jog", making a sharp angle, or acquire a curve. Then, move on to the next point.

Now I actually render the blade. Walking along the control points drawing segments is intuitive, but it seemed tricky to make sure the space between each segment gets filled in properly. So instead, I actually iterate over every pixel in the image. I determine which control point is closest to that pixel, then check the distance to it. If it's within the blade's radius, we'll draw it.
Color: here's how I decide what color a blade pixel will be:
- In the point metadata, I previously saved a normal vector that points to the "left" of the control point. I can do a dot product between that and the vector between the pixel and the control point to figure out if it's on the left or right side of the blade. I pick the light color or the dark color based on that.
- Darken the color based on how far along the blade the control point is (another value I stored in the metadata).
- If the pixel is very close to the edge of the blade (i.e. the distance between it and the control point is close to the blade width), I blend in the very light "edge" color.
For most of these operations, I'm using linear interpolation to blend two different colors together.

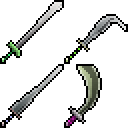
It's not the same sword, sorry, I don't have seeding yet.
Next, it's on to the hilt. This is much simpler: I generate another cosine wave to control the lines of the grip, a width, and a color. When randomizing colors, I usually work in HSV and convert to RGB before drawing because I'm not so interested in controlling how red or green or blue the color is, but I'm much more interesting in controlling how bright (V) and how colorful (S) it is. In this case I make sure the color has a high V so it has room to get darker to make shadows.
Then I just walk along the hilt drawing slices. There is some rounding trickery to make sure I get all the pixels filled in nicely. The color of each pixel is based on the value of a cosine wave, and darkened somewhat toward the right side.
Now the crossguard. The process for this is nearly the same as that for the blade - just in a different direction. I generate two different curves for the left and right parts, but with a high probability I just discard one of them and use the other, mirrored.
Finally, the pommel. I was getting itchy to share my work at this point, so I didn't do too much here. Just generate a random radius, and draw a circle in the same color as the crossguard that's shaded darker to the bottom-right and lighter to the top-left.
Oh, and the black border is added here at the very end. Any pixel that's empty or at the edge of the canvas, and orthogonally adjacent to a filled pixel, gets filled in black.
I hope that gives you some interesting ideas! Since you made it through all that, here's a gif of the process: